Web & Graphic Designer, Blogger, Musician, Evil Clown. I also code websites and promote people for a living. Still kind of a jerk, though. Approach with food.
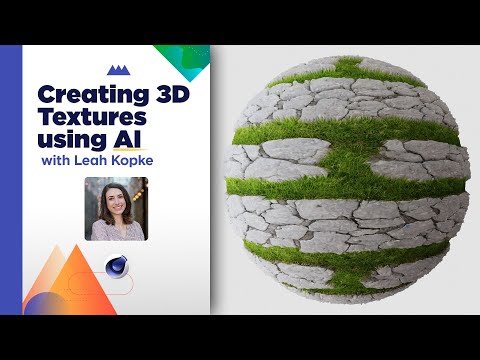
“ AI has taken the industry by storm over the last year from AI assisted tools to models that can create breathtaking images from text prompt but most of these tools were geared towards 2D design and animation leaving some artists wondering when 3D will get a little love from the robots. Well wait no longer because SOM Student Mentor and 3D Freelance Designer Leah Kopke is here to show you how you can create seamless textures for your 3D models using With Poly: A hot new 3D texturing software available right in your browser!
00:00 Intro
00:38 What Is an Atlas Texture?
01:42 Creating Seamless Textures in With Poly
10:00 Creating Atlas Textures in With Poly
14:14 Adding Your Textures to 3D Objects
18:38 Outro
Web & Graphic Designer, Blogger, Musician, Evil Clown. I also code websites and promote people for a living. Still kind of a jerk, though. Approach with food.
Web & Graphic Designer, Blogger, Musician, Evil Clown. I also code websites and promote people for a living. Still kind of a jerk, though. Approach with food.
Web & Graphic Designer, Blogger, Musician, Evil Clown. I also code websites and promote people for a living. Still kind of a jerk, though. Approach with food.
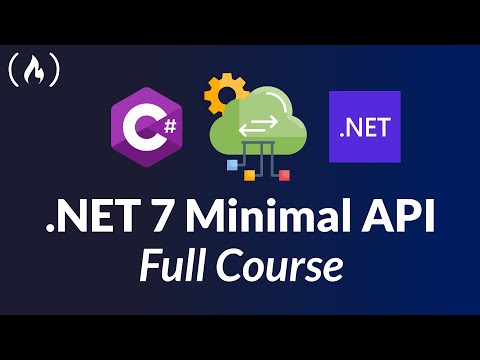
“ Learn how to build Minimal APIs in .NET 7 with hands-on course. By the end of the course, you will be able to build well-constructed Minimal API Endpoints using C#, .NET7, and Swagger.
Web & Graphic Designer, Blogger, Musician, Evil Clown. I also code websites and promote people for a living. Still kind of a jerk, though. Approach with food.
“ Learn college Algebra from an experienced university mathematics professor. You will also learn how to implement all the Algebra concepts using the Python programming language.
Web & Graphic Designer, Blogger, Musician, Evil Clown. I also code websites and promote people for a living. Still kind of a jerk, though. Approach with food.
Web & Graphic Designer, Blogger, Musician, Evil Clown. I also code websites and promote people for a living. Still kind of a jerk, though. Approach with food.
💥 Don’t get over-charged with expensive pay-per-clip pricing. Embrace the freedom of an unlimited library with Storyblocks
â–º http://storyblocks.com/Cinecom
Web & Graphic Designer, Blogger, Musician, Evil Clown. I also code websites and promote people for a living. Still kind of a jerk, though. Approach with food.
“ Demonstration using a one-click web-based conversion tool that makes app store files for you from a web application built using JavaScript, CSS and HTML.
Web & Graphic Designer, Blogger, Musician, Evil Clown. I also code websites and promote people for a living. Still kind of a jerk, though. Approach with food.
Web & Graphic Designer, Blogger, Musician, Evil Clown. I also code websites and promote people for a living. Still kind of a jerk, though. Approach with food.
Disclaimer: The views expressed herein are solely those
of Eric Brooks. They do not necessarily
reflect those of his employers, friends, contacts, family, or even his pets (though my cat,
Puddy,
seems to agree with me on many key issues.). In accordance to my terms of use, you hereby
acknowledge my right to psychoanalyze you, practice accupuncture, and mock you incessantly
with every visit. As the user, you also acknowledge that the author has been legally declared
a "Problem Adult" by the Commonwealth of Pennsylvania, and is therefore not
responsible for any of his actions. ALSO, the political views and products advertised on this site may/may not reflect the views of Puddy or myself, so please don't take them as an endorsement. We just need to eat.