How to Use RSS Feeds

EricBrooks.Com Tutorials
Ya know, for a supposed “Web Geek”, I can be pretty slow on the uptake sometimes. I have heard about “RSS Feeds” for years , but the way it’s been described, it just sounded like something only Techno-ÜberNerds would be interested in.

“You need a news aggregator, application, ping this, dilithium crystal flux capacitor… blah, blah, blah…”
*Yawn*…

Anyway, for us English-speaking folks that doesn’t have every episode of Star Trek memorized…
Recently, I have learned there are a whole lot of uses for everyone with RSS Feeds. Mainly, it can save you a lot of time and only visit a site when there’s something new and interesting. It’s great, especially if you are a very busy person, and/or or have blogging friends scattered everywhere.

So here is how to bookmark “Live Content”. You can not only do it with *my* RSS feeds, but any other sites that offers feeds as well.


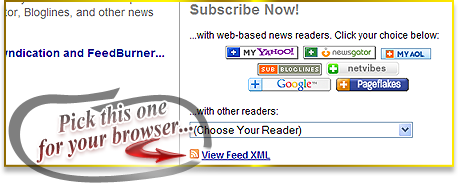
STEP ONE: Go to the RSS Page…
EricBrooks.Com RSS Feed PageSubscribe to EricBrooks.Com via RSS Feeds
Click on any one of the feeds that may interest you…

Clicking on the EricBrooks.Com main RSS Page

You have the option to put them on your Google Page (or Google Reader), or MyYahoo, but what we want is to bookmark it in our browsers… Firefox appears to be the most popular browser these days, according to recent stats, so I will mainly focus on that in here..

Choose "View Feed XML" for Live Bookmarks


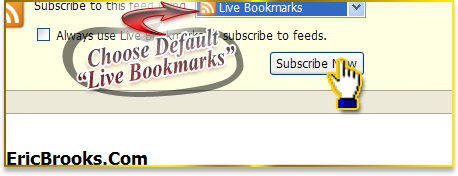
STEP TWO: Subscribe with “Live Bookmarks” (Firefox)…

  • With Chrome, add it to your Google Reader.
  • With Safari, click on the “RSS” button in the address bar, and then click on “Actions:” > “Add Bookmark” on the lower right side, and view in your toolbar.
  • With Internet Explorer, click on the RSS Icon EricBrooks.Com RSS Feed Page in the right side of your toolbar and subscribe, and then view it in your “Feeds” tab in “Favorites”… but does anyone even use IE anymore???

Keep it on the default “Live Bookmarks” and press the “Subscribe Now” button…

Keep it on the default "Live Bookmarks" and press the "Subscribe Now" button


STEP THREE: Find the feed in your bookmarks… In your Firefox Bookmarks (And you can save it anywhere in your bookmarks, actually. It’s best to keep all your favorite reads in one spot.), you’ll find a special icon for feeds, and in that, a full list of items…

You will now see the EricBrooks.Com site feed in your Bookmarks Toolbar

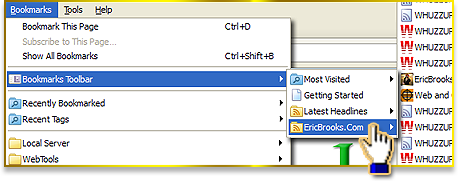
You can see by the icons what is fresh content or what you have visited already…

The icons will indicate what is "read" and "unread"

Like I said, you can not only do that with this site, but other sites you like that offer RSS Feeds. It’s the way the web is going now, with content and information flying shorter and faster.
Don’t forget to subscribe to my feeds, ok? 😉

Eric Brooks

Musician, Programmer, Graphic Designer, Evil Clown - A thorn in the Internet's side since 1997 with no intention of stopping any time soon.

More Posts - Website

Follow Me:
TwitterFacebookLinkedInPinterestYouTube

How To Resize Blog Comments on MySpace

So you’ve written this great blog, so careful to make sure nothing stretched your screen in your post…. so meticulous, as you want to make sure everyone can digest what you’re trying to say without side scrolling….

Suddenly some HTML-Challenged putz leaves a graphic from Photobucket in your comments that should be used as desktop wallpaper!!! ARRRRRRGH!

Don’t you hate when that happens?
No worries, we’re about to fix that.


HOW TO AUTOMATICALLY RESIZE THE GRAPHICS IN YOUR BLOG COMMENTS

************ UPDATED 03/23/09 ****** NEW CODE BELOW *******

– Go to Customize Blog in your blog control panel.
– Paste the following CSS code in your “Your own Additional Style Sheet” box:

td.blogComments {font-size: 13px; width:499px; max-width:550px; width:auto; height:auto; overflow:hidden;}
td.blogComments img {width:499px; max-width:550px; width:auto; height:auto;}
td.blogComments object {width:549px; height:450px; max-width:550px;}
td.blogComments embed {width:549px; height:450px; max-width:550px;}
*html .main .blogComments td.blogComments  {width:450px; height:auto; overflow:hidden}

What that code does is tell the browser that any picture or video over 550 pixels wide is going to be shrunk to that size (with the height automatically proportioned….)

There’s only ONE itty bitty problem. This code will work on every browser except Internet Explorer (you know the one that 47% of your readers are using?). Works like a charm on Firefox, Safari, Netscape, Chrome and Flock though.

Why people still use Internet Explorer… I have no idea. It doesn’t recognize the “max-width” attribute, which is the key to this whole trick. Mozilla-based browsers smoked I.E. in the “Browser Wars” years ago. You can also use JavaScript to make it work in I.E., but that’s a major “no-no” on MySpace.

The best you can do here is cut off anything longer than 550 px; from the screen in I.E…

I don’t care what the blog looks like in Internet Explorer, anyway. I use Firefox.

Download Firefox 3 – The Best browser out there…

Download Firefox

Or….
Download Flock (The Social Browser)
Download Google Chrome
Download Apple Safari
Download Opera (Thx, Jared)

REMEMBER: Friends don’t let friends use Internet Exploder!!!!


Try and stretch out my MySpace blog with a graphic, video, or text… I DARE YA!

Subscribe to my MySpace Blog!

Eric Brooks

Musician, Programmer, Graphic Designer, Evil Clown - A thorn in the Internet's side since 1997 with no intention of stopping any time soon.

More Posts - Website

Follow Me:
TwitterFacebookLinkedInPinterestYouTube

Making iTunes (and other fancy) buttons

There’s a great tutorial on Unlimit-3D.Com on how to make those glassy iTunes buttons that seem all the rage these days. iTunes button

It’s quite innovative in that it uses the rulers, pen tool and bezier curves that no one seems to use in Photoshop.

Here’s my first-time attempt on the right ~~~~>
I should have made the left side more curvy… maybe next time as I learn how to master the pen tool.
Continue reading “Making iTunes (and other fancy) buttons”

Eric Brooks

Musician, Programmer, Graphic Designer, Evil Clown - A thorn in the Internet's side since 1997 with no intention of stopping any time soon.

More Posts - Website

Follow Me:
TwitterFacebookLinkedInPinterestYouTube

It’s Vectors for me…

Interesting Discovery:
I use photoshop for most of my graphics. Then I open up the .PSD files in Fireworks to make .gifs (they just look better to me.)

  • Since fireworks is vector-based (rather than rasterized), I converted the .psd file I rendered in poser into a .png (Portable network graphics).
  • Then I imported the .png file into flash for the front page of EricBrooks.Com
  • Now it expands & contracts with no loss in quality. I couldn’t do that if I had imported a .jpg. Plus the flash file is only 39kb. Using a .jpg that file size (800x600px) would have put it well over 100k.

    It’s vector graphics from now on for me….
    (Just a little something to keep you busy while I delete a bunch of files here…)

    Eric Brooks

    Musician, Programmer, Graphic Designer, Evil Clown - A thorn in the Internet's side since 1997 with no intention of stopping any time soon.

    More Posts - Website

    Follow Me:
    TwitterFacebookLinkedInPinterestYouTube

    Comment Permalinks in MT

    I just added permalinks to the comments.

    There’s a bunch of tutorials out there, but I forgot to bookmark them, so, like an idiot, I had to do it from scratch.

    Here’s what I did:
    In your Comment Listing Template

  • First you need to make an Anchor for each comment entry. Find where it says:

    <$MTCommentBody$>

    And change it to:
    <a name=”<$MTCommentID pad=”1″$>”></a>

    <$MTCommentBody$>

  • Next, make the permalink. For the sake of argument, I put it at the end of the comment, after the date (<$MTCommentDate$>). You can put it anywhere you want. The code for the permalink is:

    <a href=”<$MTCGIPath$>mt-comments.cgi?entry_id=<$MTEntryID$>#<$MTCommentID pad=”1″$>”>Link</a>

  • For example, when Jennifer announced her new domain: Link

    So there…

    Eric Brooks

    Musician, Programmer, Graphic Designer, Evil Clown - A thorn in the Internet's side since 1997 with no intention of stopping any time soon.

    More Posts - Website

    Follow Me:
    TwitterFacebookLinkedInPinterestYouTube

    Using Images on your buttons

    “how do you get the fade effects on your buttons?”

    Even though I know kd knows this answer… *wink*…

    How to make your buttons go…

    It’s all CSS, my dear!
    1. I made a selector called .”btn”
    2. In my css:
    .btn { background: #FFCC00 url(img/btn.gif); background-repeat: repeat; border-color: #FFCC00; color: #000000; font-weight: bold; font-size: 9pt; font-style: normal; font-family: Arial, Helvetica, sans-serif;}

    3. btn.gif
    is the gradient background in the buttons.

    4. <input type=”submit” class=”btn”>

    You can more or less use any image as a backround anywhere on your page with css….

    Any questions?

    Eric Brooks

    Musician, Programmer, Graphic Designer, Evil Clown - A thorn in the Internet's side since 1997 with no intention of stopping any time soon.

    More Posts - Website

    Follow Me:
    TwitterFacebookLinkedInPinterestYouTube

    Proudly powered by WordPress
    Creative Commons License
    EricBrooks.Com® is licensed under a Creative Commons License.

    Disclaimer: The views expressed herein are solely those of Eric Brooks. They do not necessarily reflect those of his employers, friends, contacts, family, or even his pets (though my cat, Puddy, seems to agree with me on many key issues.). In accordance to my terms of use, you hereby acknowledge my right to psychoanalyze you, practice accupuncture, and mock you incessantly with every visit. As the user, you also acknowledge that the author has been legally declared a "Problem Adult" by the Commonwealth of Pennsylvania, and is therefore not responsible for any of his actions. ALSO, the political views and products advertised on this site may/may not reflect the views of Puddy or myself, so please don't take them as an endorsement. We just need to eat.


    Connect